

DirArt on commodore disks are not just static images scrolling by, they are technically programs in memory. They blow up if you run them, but each filename can be thought of as a separate sequence of control code commands. They can be combined with together to make animations or even setup the user to execute basic code at the end of the listing.
NOTE: I would read up on my previous article: 1 “CBM DIRART BASICS/CONCEPTUAL STUFF” PRG as I’m skipping the basics 🙂
Above is a “Demo” I wrote for ZOO ’19 — its nothing special but it shows some PETSCII from my last C64 BBS “The Crypt” from the 1990s. I thought I would experiment with some Dir Art Animations after seeing a youtube video by Robin Harbron.
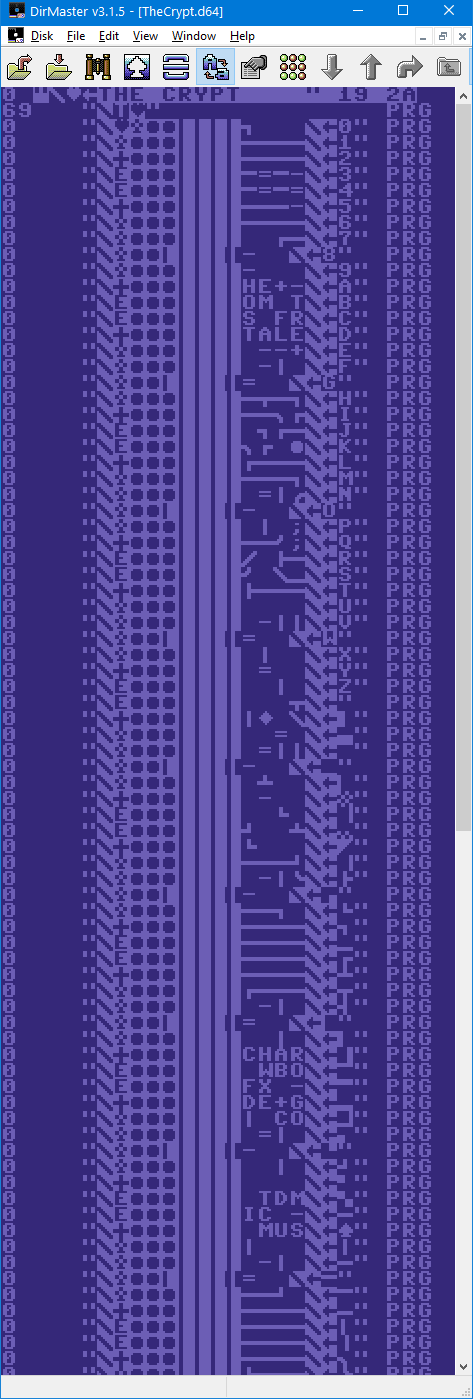
The long.. very long directory is “The Crypt” DirArt animation opened in DirMaster.
This was created by a BASIC program, which had a large array with a mono version of the PETSCII logo image. Then the Basic program would split it up each line into 4 character chunks (columns) then prepend and append codes and save a copy of itself as a file with that name. Later on, I edited the disk in DirMaster to make the files zero length and do minor cleanup. Technically, any method to write file names to disk can be used to create the animations. Simple stuff can be done in DirMaster or manually in the screen editor but as the complexity grows the need for either Basic/ASM starts to become a necessity. I’ve been using CC1541 to generate files as well, but that’s a whole other topic.
When using BASIC, the file names all have to be unique, you’ll see a char at the end of the filename. This is to give me unique files. I’m sure I could code something to get over that, but like always I was in a rush for the compo.
NOTE: After the animation completes — you can hit ENTER and it loads the demo AND runs it 🙂 It was pretty cool when I figured that one out. I’ll explain that near the end.
The basics of the animation are:
– Control Codes Clear the Screen (in the Header) and the first file (which is the demo itself)
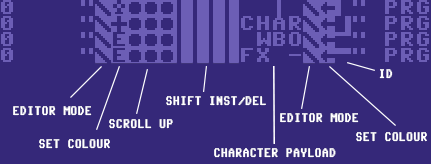
– The next 8 filenames (after the Demo file) comprise the first line of the PETSCII Animation/Image, then every 8 files after that is another screen line.. and so on.
The file name starts with: “enable editor mode >> sets a column colour >> CURSOR UP three lines >> SHIFT INST DEL four chars >> then draws the characters of the image >> enable edit mode >> change the colour to dark blue >> ID char”
The next file basically does the same, which pushes the previous characters over and prints new ones in the gap. Till you get to the end of the line and so on to the end of the image.
If you want to test out code combo’s just turn on the machine and use PRINT statements that are 16 characters long. Or you can make a small PRG to do a template.
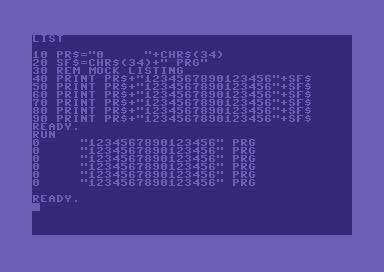
10 pr$="0     "+chr$(34)
20 sf$=chr$(34)+" prg"
30 rem mock listing
40 print pr$+"1234567890123456"+sf$
50 print pr$+"1234567890123456"+sf$
60 print pr$+"1234567890123456"+sf$
70 print pr$+"1234567890123456"+sf$
80 print pr$+"1234567890123456"+sf$
90 print pr$+"1234567890123456"+sf$
In the Basic screen editor, when you open up a PRINT statement with a double quote (“) you can enter one control code. If you want to enter multiple codes, use SHIFT INST/DEL multiple times and enter your control codes. You can use in the middle of a text block as well..
Clean up after controlling around..
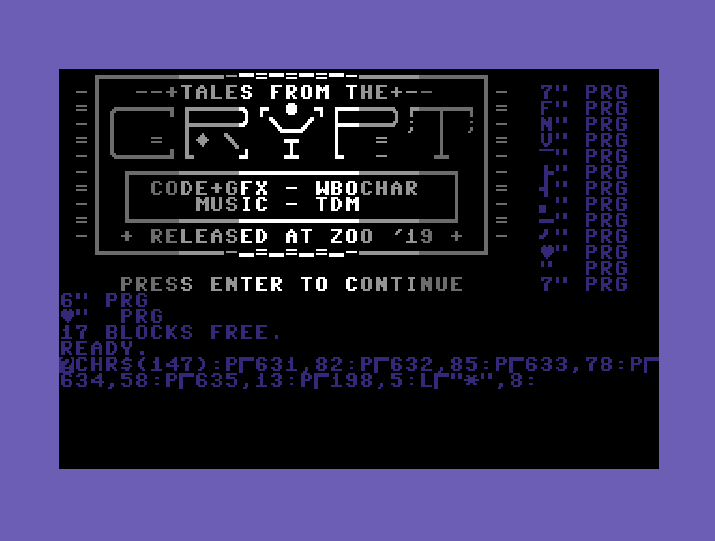
If you look to image under the directory listing with the background changed to black, you will see all the garbage hidden in the blue. All directory entries have a block size, file name and file type followed by an enter. So since the background of the screen is blue, if you set the font colour to blue at the end of filename, it will hide the file type (and the next line block size).
Auto Load and Run by Pressing enter at the end of the listing
The last line of this animation is not an animation. It is a chunk of Basic at the end of the listing. When the user hits ENTER it LOAD’s and RUN’s the demo. Tell me that isn’t cool (pats own back — pat pat).
The code cannot be longer than two lines, as that is a limitation of the Basic screen editor. There are some issues with ” (double quotes) so lets say we can only use them twice in the code segment (a simplification). Also the last/previous filename before the code gets written out, needs to place the command several lines down, exactly after where “READY.” will show up and come back up to where it should be normally. A little time travel..
So the code does this:
PRINT COMMAND -> CLEAR SCREEN -> POKE 82,85,78,58,13 INTO KB BUFFER ->POKE 5 INTO KB BUFFER SIZE VAR->LOAD “*”,8
So “82,85,78,58,13” = “RUN:[ENTER]”
So the way Basic runs this, it will take each segment/command from the right first — it loads the program, injects RUN[ENTER] in the KB buffer, clears the screen and the KERNAL during its IRQ processes outputs the KB buffer to the screen and runs the program.
Links
https://csdb.dk/release/?id=193584
https://csdb.dk/release/?id=175500
Notes/Thanks
PETSCII still evolves today, there are sites and groups (and c64 BBS/telnet servers) actively participating in creating new content daily. Shine runs the Facebook group: PETSCII World and has a dedicated discord server as well. If you want to learn more about PETSCII, start there 🙂
Robin continually shows us that there is more to learn about our venerable lady the C64 (and her brothers and sisters :)). He is a pleasure to watch and is an excellent hand model, hehe.
Robin’s video on DirArt anims
Change Log
- Entry One
- Added Notes and Thanks